AI Stick Figure Animation: One Character, a Whole Episode in One Batch
AI stick figure animation for faceless YouTube: one character sheet, a 40–60 shot table, one batch run, and Nano Banana 2 vs Lite on cost and consistency.
On this page
- Why a stick figure still drifts
- Step 1: Design the character once
- Step 2: Turn the script into a 40–60 shot table
- Step 3: Write one line per shot
- Step 4: Run the whole episode in one batch
- Nano Banana 2 vs Lite: cost and consistency
- Step 5: Check, fix, download
- Variations for other faceless niches
- FAQ
- The whole workflow on one card
Stick figure videos are one of the easiest faceless YouTube formats to start: trivia, history, motivation and kids' explainers all work with a simple character and a narrator. The hard part isn't drawing one stick figure. It is drawing the same stick figure 50 times — same head, same cap, same line weight, same paper — so the episode looks like one channel and not a pile of clip art.
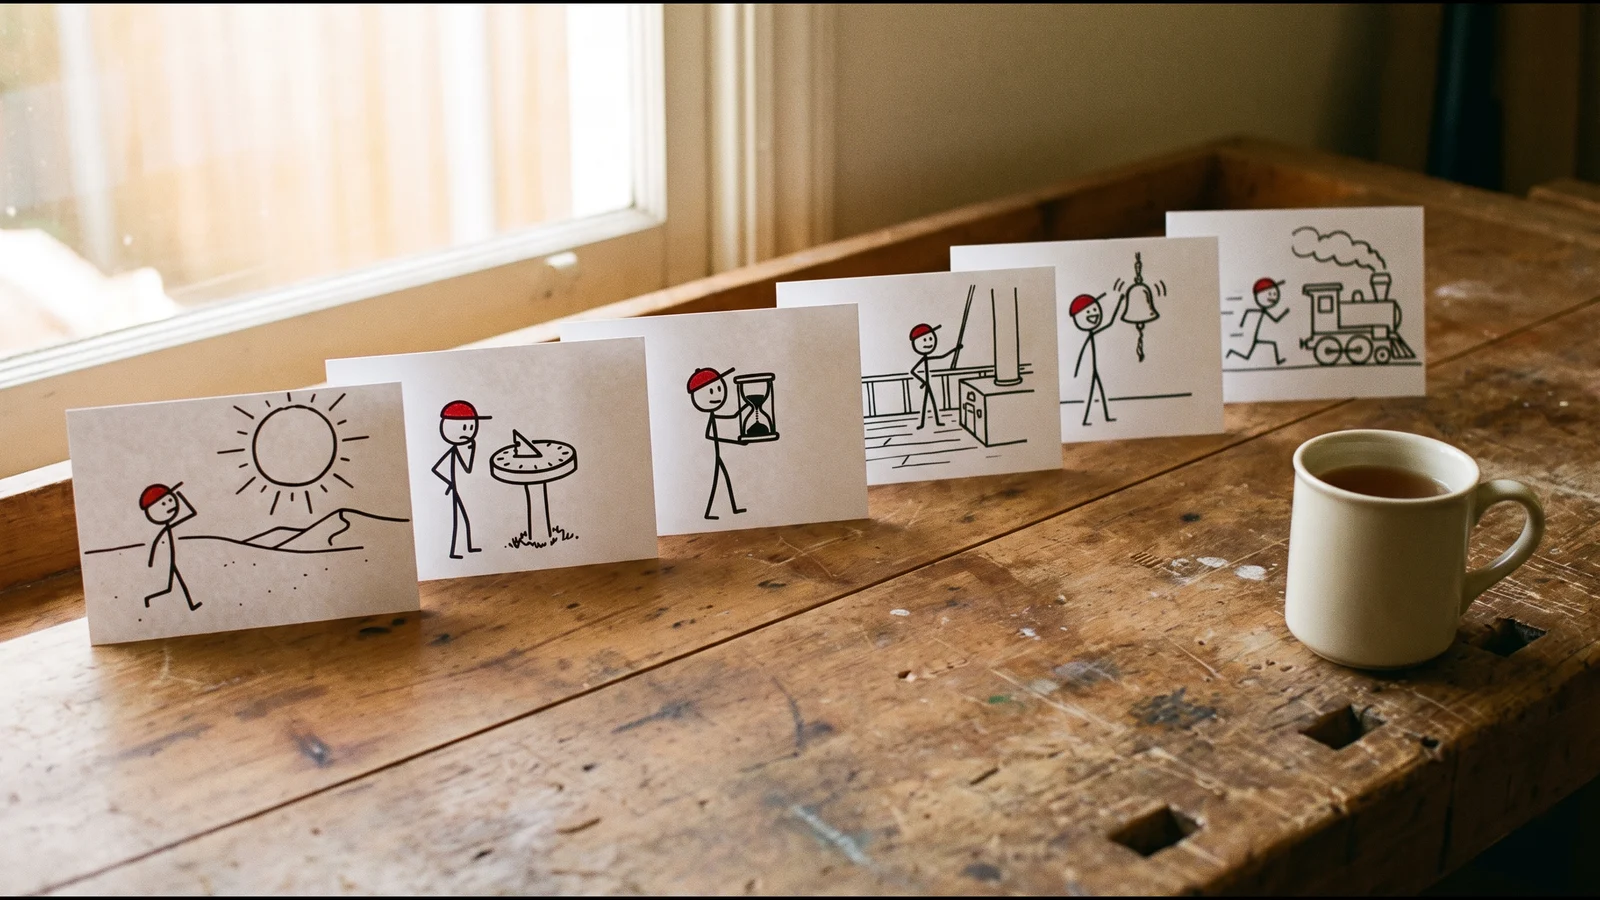
This guide shows how to do AI stick figure animation as one job: design the character once, turn the script into a 40–60 shot table, and generate every shot in one batch with the character sheet attached. We also ran the same ten shots on Nano Banana 2 and Nano Banana 2 Lite to see what the cheaper model costs you in consistency. Every image in this post comes from those test batches, for an invented episode: How people told time before clocks.
Note
Most stick figure channels aren't frame-by-frame animation. They are a sequence of still shots, cut on the narration, with slow zooms, pans and simple motion added in the video editor. This post covers the stills — the part that takes the longest and has to stay consistent.
Generate in bulk
One prompt per line, hundreds of images, one ZIP to download.
Why a stick figure still drifts#
A stick figure looks too simple to go wrong, but every image in a batch is rendered on its own. Whatever your prompt leaves open, the model decides again: a round head or an oval one, dot eyes or no eyes, hands or no hands, thin pencil lines or thick marker, a white page or a coloured background. Over 50 shots, those small decisions add up to an episode that looks stitched together.
The fix is the same as for any recurring character, explained in more depth in our guide to consistent character AI images: show the model the character with a reference image, and repeat one sentence that names what must not change. What's specific to stick figure channels is the scale — a whole episode, not six storyboard panels — and the fact that the background style matters as much as the character.
Step 1: Design the character once#
Make one character sheet and use that exact file for the whole channel. Four rules:
- One figure, full body, front view, plain background. Nothing should compete with the character.
- The final style. If the episodes are black marker on off-white paper, so is the sheet.
- One colour accent. A plain black stick figure has nothing for the eye to track between shots. A single coloured item — a red cap, a yellow scarf, a blue backpack — makes the character recognisable at thumbnail size and gives you something easy to check.
- Decide the small parts. Hands and feet are where stick figures drift most. Pick a shape — solid mittens, round circles, plain line ends — and write it down.
Our character sheet came from one text-only prompt, run twice on Nano Banana 2 at 1:1 (8 credits). We kept the second one:
Character reference sheet image of a stick figure mascot for a faceless YouTube channel: one single full-body stick figure, front view, standing straight, arms slightly away from the body. Round white head with a thick black outline, two black dot eyes, a small curved smile, no nose, no ears. Body, arms and legs are single thick black lines of equal weight, simple round hands with no fingers, simple feet. Wears a small red baseball cap facing forward. Clean hand-drawn black marker lines, flat colours, plain off-white paper background, even light, no shadows, no text, no letters, no logos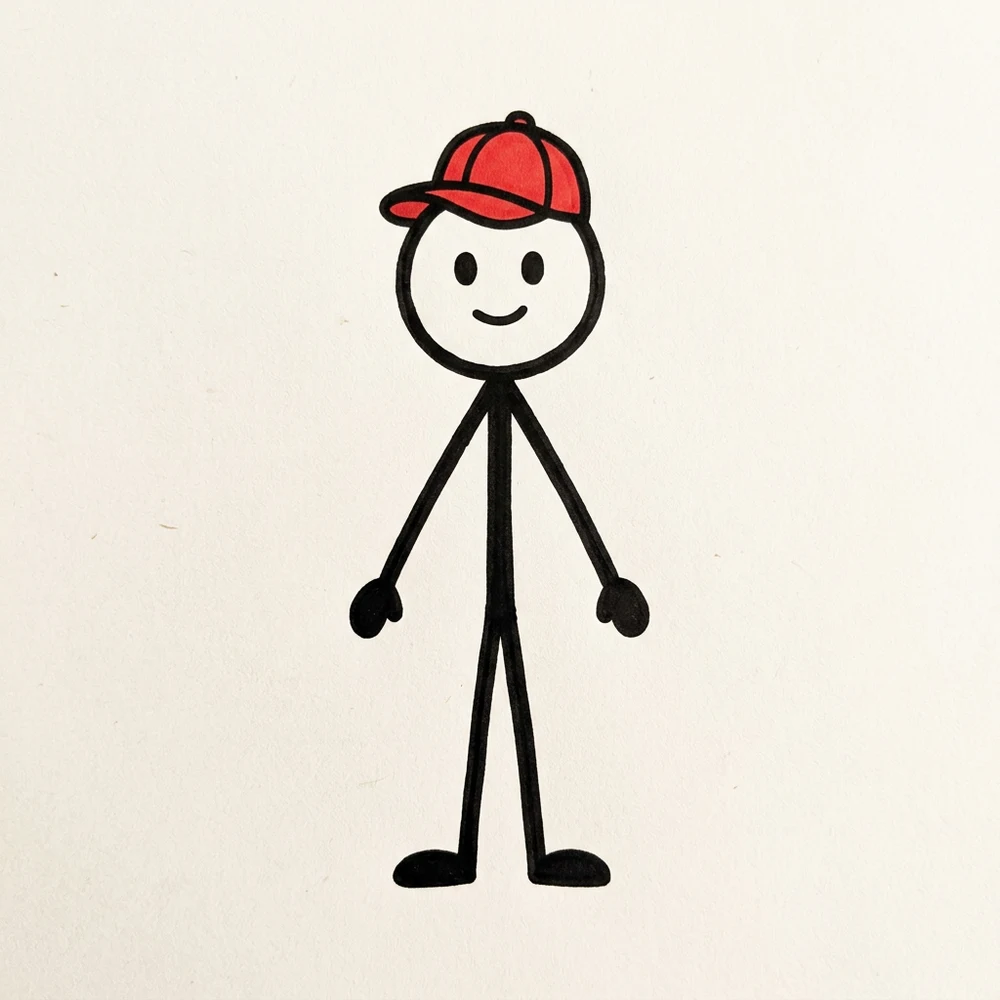
Notice it didn't follow the prompt to the letter: we asked for round hands and got solid mittens and oval feet. That's fine — the sheet, not the prompt, is now the source of truth, so the lock sentence below describes what the sheet shows.
Step 2: Turn the script into a 40–60 shot table#
Narration usually runs at around 130–150 words a minute, so an eight-minute episode is roughly 1,100 words. Change the picture every two sentences or so and you land at 40–60 shots. Fast trivia channels cut more often; calm history or motivation videos hold a shot longer and lean on zooms.
Plan the episode in a table before you write a single prompt. One row per shot, and the column that matters is what the viewer sees, not what the narrator says:
| Shot | Narration (beat) | What the viewer sees | Camera |
|---|---|---|---|
| 01 | "Long before clocks, people watched shadows." | Standing next to a tall stick in desert sand, looking at its shadow | Wide |
| 02 | "The Egyptians and Romans turned that into a tool." | Crouching beside a stone sundial in an ancient garden, pointing at the shadow | Medium |
| 05 | "Sand was even simpler." | Holding up a large glass hourglass | Close-up |
| 09 | "Railways forced every town onto one time." | Running along a platform beside a steam train, checking a pocket watch | Side view |
A shape that works for most faceless episodes:
| Part | Shots | What goes there |
|---|---|---|
| Hook | 3–5 | The question or surprising fact, the character reacting |
| Chapters (4–6) | 8–10 each | One idea per shot; one prop or place per shot |
| Recap | 3–4 | The character with the key props from each chapter |
| Outro | 2–3 | The character waving, pointing, or walking off |
Three rules keep the table usable:
- One action per row. "Pours water and then checks the time" is two shots.
- Concrete objects, not concepts. "Standardised time" can't be drawn; "a steam train at a platform" can.
- Vary the camera. Wide, medium, close-up, from below. A row without a camera direction tends to come back at the same distance as the last one, and 50 identical medium shots feel static even with zooms.
Step 3: Write one line per shot#
Each prompt line has three parts: the shot from your table, the lock sentence for the character, and the style lock for the background. The second and third parts are identical on every line.
Shot [NN] – [what the viewer sees], [camera]; the stick figure from the reference image, kept exactly as it is: same round white head with a thick black outline, same two black dot eyes and small smile, same single thick black lines for body, arms and legs, same solid black mitten hands and solid black oval feet, same red baseball cap with the brim pointing to the side, same proportions as the reference; simple hand-drawn black marker line art on an off-white paper background, flat muted colours only on props and scenery, minimal background, wide 16:9 composition, no text, no letters, no numbers, no logosDownloaded files are named with a running number plus the first words of their prompt, so starting each line with Shot 01, Shot 02 puts your own shot number in every file name — handy when you cut a chapter or re-run a shot and the running numbers no longer match the table. If your table already lives in a spreadsheet, put the finished lines in a column headed prompt and upload it in Spreadsheet mode — the other columns are ignored, so you can keep the narration next to each shot.
Here are the first three of our ten shots, ready to run once the character sheet is attached:
Shot 01 – standing next to a tall wooden stick planted in desert sand under a bright sun, looking at the stick's long shadow, wide shot; the stick figure from the reference image, kept exactly as it is: same round white head with a thick black outline, same two black dot eyes and small smile, same single thick black lines for body, arms and legs, same solid black mitten hands and solid black oval feet, same red baseball cap with the brim pointing to the side, same proportions as the reference; simple hand-drawn black marker line art on an off-white paper background, flat muted colours only on props and scenery, minimal background, wide 16:9 composition, no text, no letters, no numbers, no logos
Shot 02 – crouching beside a round stone sundial in an ancient garden, pointing at the shadow line on it, medium shot; the stick figure from the reference image, kept exactly as it is: same round white head with a thick black outline, same two black dot eyes and small smile, same single thick black lines for body, arms and legs, same solid black mitten hands and solid black oval feet, same red baseball cap with the brim pointing to the side, same proportions as the reference; simple hand-drawn black marker line art on an off-white paper background, flat muted colours only on props and scenery, minimal background, wide 16:9 composition, no text, no letters, no numbers, no logos
Shot 05 – holding up a large glass hourglass with sand running through it, close-up of the upper body; the stick figure from the reference image, kept exactly as it is: same round white head with a thick black outline, same two black dot eyes and small smile, same single thick black lines for body, arms and legs, same solid black mitten hands and solid black oval feet, same red baseball cap with the brim pointing to the side, same proportions as the reference; simple hand-drawn black marker line art on an off-white paper background, flat muted colours only on props and scenery, minimal background, wide 16:9 composition, no text, no letters, no numbers, no logos
Two details in the style lock do most of the work. "Off-white paper background" keeps every shot on the same page — without it, scenes come back with skies and walls painted edge to edge. "No text, no letters, no numbers" keeps signs, clock faces and labels blank; titles and captions belong in your editor, where you can spell them right.
Step 4: Run the whole episode in one batch#
- Open the dashboard and start a New batch.
- Upload the character sheet under Reference images and choose Per image. With one reference, every line is paired with it: 50 lines = 50 images.
- Paste the shot lines, one per line.
- Set 16:9 for regular videos, or 9:16 for Shorts — one batch per format. Keep Images per combo at 1.
- Pick the model (next section), read the estimate — Will generate 50 images · N credits — and press Start batch.
Each plan has a per-batch image limit; if your episode is longer, run one batch per chapter with the same sheet and the same lines. Pricing lists the limit for each plan.
Here are all ten shots of our test episode from one Nano Banana 2 batch:
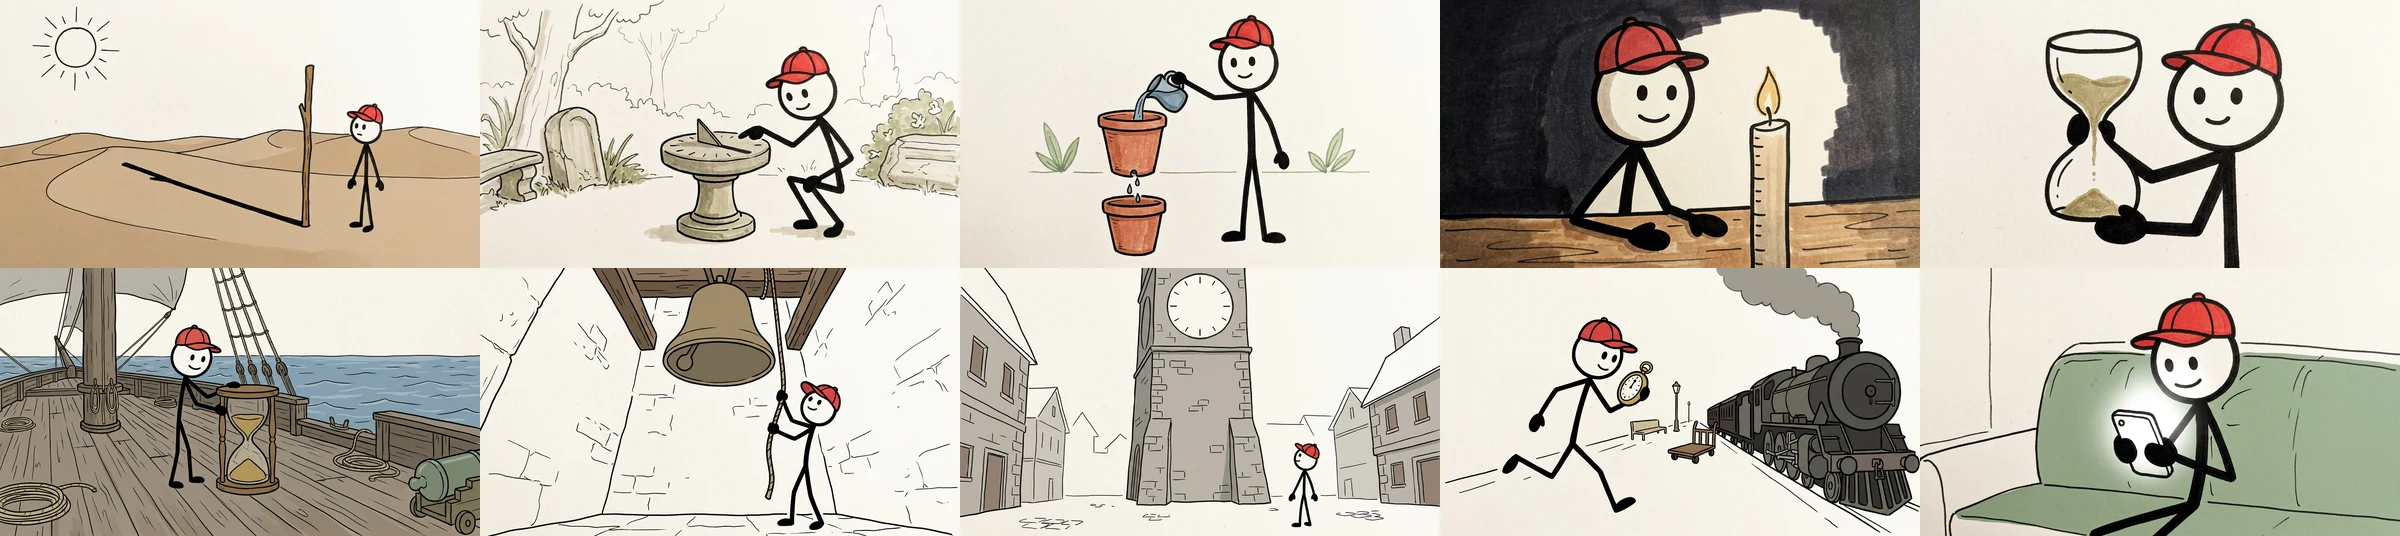
The character held in all ten: the same head, dot eyes, smile, mitten hands, oval feet and red cap, from a tiny figure in a town square to a close-up by a candle. The cap's brim switches sides with the way the figure faces, which reads naturally for a stick figure. No shot had stray lettering, and the clock tower came back with a plain face and tick marks, as asked.
It wasn't perfect, and the misses are worth knowing:
- Physics is weak. In shot 01 the shadow points towards the sun instead of away from it. If a shot's point depends on a shadow or a clock time, check it — or keep that detail out of the frame.
- Props get simplified. We asked for a clay pot that drips through a hole into a second pot; it drew two flowerpots and a watering can. The idea reads, but name the object's shape if it matters.
- Extras appear. The ship deck gained a cannon we didn't ask for. Harmless here; add "no weapons" to a line when it isn't.
Nano Banana 2 vs Lite: cost and consistency#
Nano Banana 2 Lite costs 3 credits an image against 4 for Nano Banana 2 at 1K — 25% less. We ran the same ten lines with the same character sheet on Lite, in a separate batch, once, without picking favourites. Both models returned 16:9 images at 1376 × 768 px.
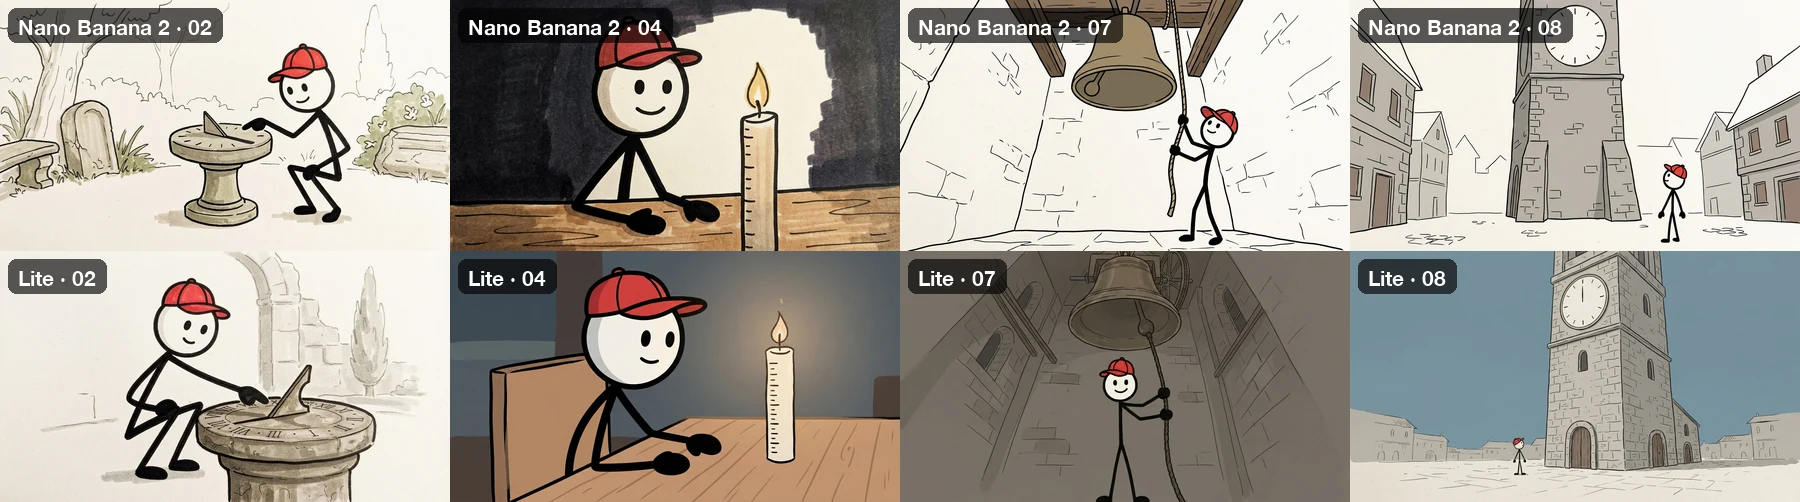
The character held on both. Lite kept the head, eyes, smile, hands, feet and red cap in all ten shots, just like Nano Banana 2. If all you need is a recognisable figure, Lite does the job.
The page didn't. Lite moved off the paper in four of the ten shots: the candle scene, the bell tower, the clock tower and the sofa came back as flat digital colour — dark blue walls, grey stone painted edge to edge, a solid blue sky. Cut between those and the paper-and-marker shots, and the episode visibly changes style. Lite also put Roman numerals on the sundial, despite "no numbers" in every line. Nano Banana 2 stayed on the off-white page in all ten and drew no numerals anywhere.
Lite did win one shot: its water clock looks like clay pots, closer to the line than Nano Banana 2's flowerpots.
| Nano Banana 2 · 1K | Nano Banana 2 Lite · 1K | |
|---|---|---|
| Credits per shot | 4 | 3 |
| Our 10-shot test | 40 credits | 30 credits |
| A 50-shot episode | 200 credits | 150 credits |
| Character held | 10 / 10 | 10 / 10 |
| Stayed on the paper style | 10 / 10 | 6 / 10 |
| Unwanted numbers or text | 0 | 1 (sundial numerals) |
| Higher resolutions | 2K (6 credits), 4K (10 credits) | 1K only |
The saving is smaller than it looks once you count re-runs. At the drift rate we saw, a 50-shot Lite episode would have around 20 shots to redo; re-running them costs about 60 more credits, which already puts Lite above Nano Banana 2's 200 — and the re-runs can drift again. Ten shots is a small sample, so treat 4 in 10 as a warning, not a rate.
Our suggestion:
- Publishing an episode with a paper or textured style: use Nano Banana 2. Consistency is what you're paying for.
- Testing a shot list, or a style that's flat digital colour anyway: Lite is fine — its drift goes towards flat colour, so a flat style has less to lose.
- Not sure? Run your first three shots on both with Compare models in the dashboard. It takes the same character sheet for every model and shows the shots side by side.
Whichever you choose, keep one model for the whole episode. Mixing models is a style change on its own.
Step 5: Check, fix, download#
Look at all the shots side by side before anything goes on the timeline:
- Character: head, eyes, hands, feet and the colour accent match the sheet.
- Page: every shot on the same background and line weight.
- Text: no letters or numbers on signs, clocks, screens or labels.
- Story details: the prop, place and action match the narration.
For a shot that misses, change that line — name the missing detail ("no numbers on the sundial", "plain off-white paper behind the scene") — and use Try again on that image. It re-draws one shot and leaves the rest of the batch untouched.
Then press Download all. The ZIP keeps your list order, every file name includes its Shot NN, and the archive includes a prompts.csv mapping each file to its full prompt. At 1K the shots are 1376 × 768; your editor scales them to a 1080p timeline, and thick marker lines hold up to that better than fine detail does. If you zoom deep into shots, render at 2K on Nano Banana 2 instead.
Variations for other faceless niches#
Only the style lock changes. Swap it in, keep the character line:
simple hand-drawn line art with bright flat colours on a plain white background, rounded friendly shapes, soft colours on props and scenery, wide 16:9 composition, no text, no letters, no numbers, no logosThat one suits kids' explainers. For motivation channels, a dark background with one warm light source works, but make the character sheet in that style too — a sheet drawn on white paper keeps pulling shots back towards white.
Tip
One character, one sheet, one style lock per channel. When you start a new series, keep the character sheet and reuse it — your viewers learn the character faster than they learn the channel name.
FAQ#
Can AI make the stick figure move? Not in this workflow — it makes the stills. Motion comes from your editor: cuts on the narration, slow zooms and pans, and simple position changes between shots. Because every shot uses the same character sheet, cutting between them reads as the same character moving through the story.
How many images do I need for one episode? For an eight-minute video, 40–60 is a practical range at a new shot every couple of sentences. Plan them in the shot table first; it's easier to cut rows than to fill gaps later.
Do I need to describe the character in every line? Repeat the lock sentence, not a full description. The sheet shows what the character looks like; the lock sentence tells the model which parts must stay fixed.
Will every shot be identical? The character came out very close in all twenty of our test shots across both models; the background style is what drifted. Check every shot against the sheet before you publish.
Which model should I use? For a finished episode, Nano Banana 2 held both the character and the paper style in our test. Lite held the character for 25% less but drifted off the style in four of ten shots. Our models page lists price and reference limits for every model.
The whole workflow on one card#
- One character sheet: full body, final style, one colour accent, small parts decided.
- A shot table: 40–60 rows, what the viewer sees, a camera direction on every row.
- One line per shot:
Shot NN+ scene + lock sentence + style lock. - Per image with the sheet, 16:9 or 9:16, images per combo 1, one model per episode.
- Check character, page, text and story; Try again the misses; Download all.
The shot list is just a list, so an eight-minute episode takes the same steps as our ten shots. When your character sheet is ready, open the bulk image generator and run your first chapter. For a non-stick-figure explainer style, see our guide to AI images for YouTube videos.