Script to Storyboard with AI: Shot List, References and One Batch
Go from script to storyboard with AI: number the shots, write shot size and angle into each line, lock the actor and the set, and draw the whole board at once.
Nesta página
- Step 1: Break the script into a numbered shot list
- Step 2: Make two references — the actor and the set
- Step 3: Write one line per shot
- Step 4: Draw the whole board in one batch
- The catch: the set reference also locks the camera
- Step 5: Review, fix single panels, download
- FAQ
- Can AI make a storyboard straight from a script?
- How do I keep the same actor in every panel?
- Why does every wide shot come out from the same angle?
- How many shots can I run at once?
- Should a storyboard be in colour?
- The whole workflow on one card
A storyboard is where a script turns into camera decisions. Before anyone shoots, the director, the camera team and the client need to see the same thing: where the camera is, how close it gets, and what is in the frame for every shot. Drawing that by hand takes days. Prompting an AI one panel at a time is faster, but the actor's face changes between panels and the set rearranges itself.
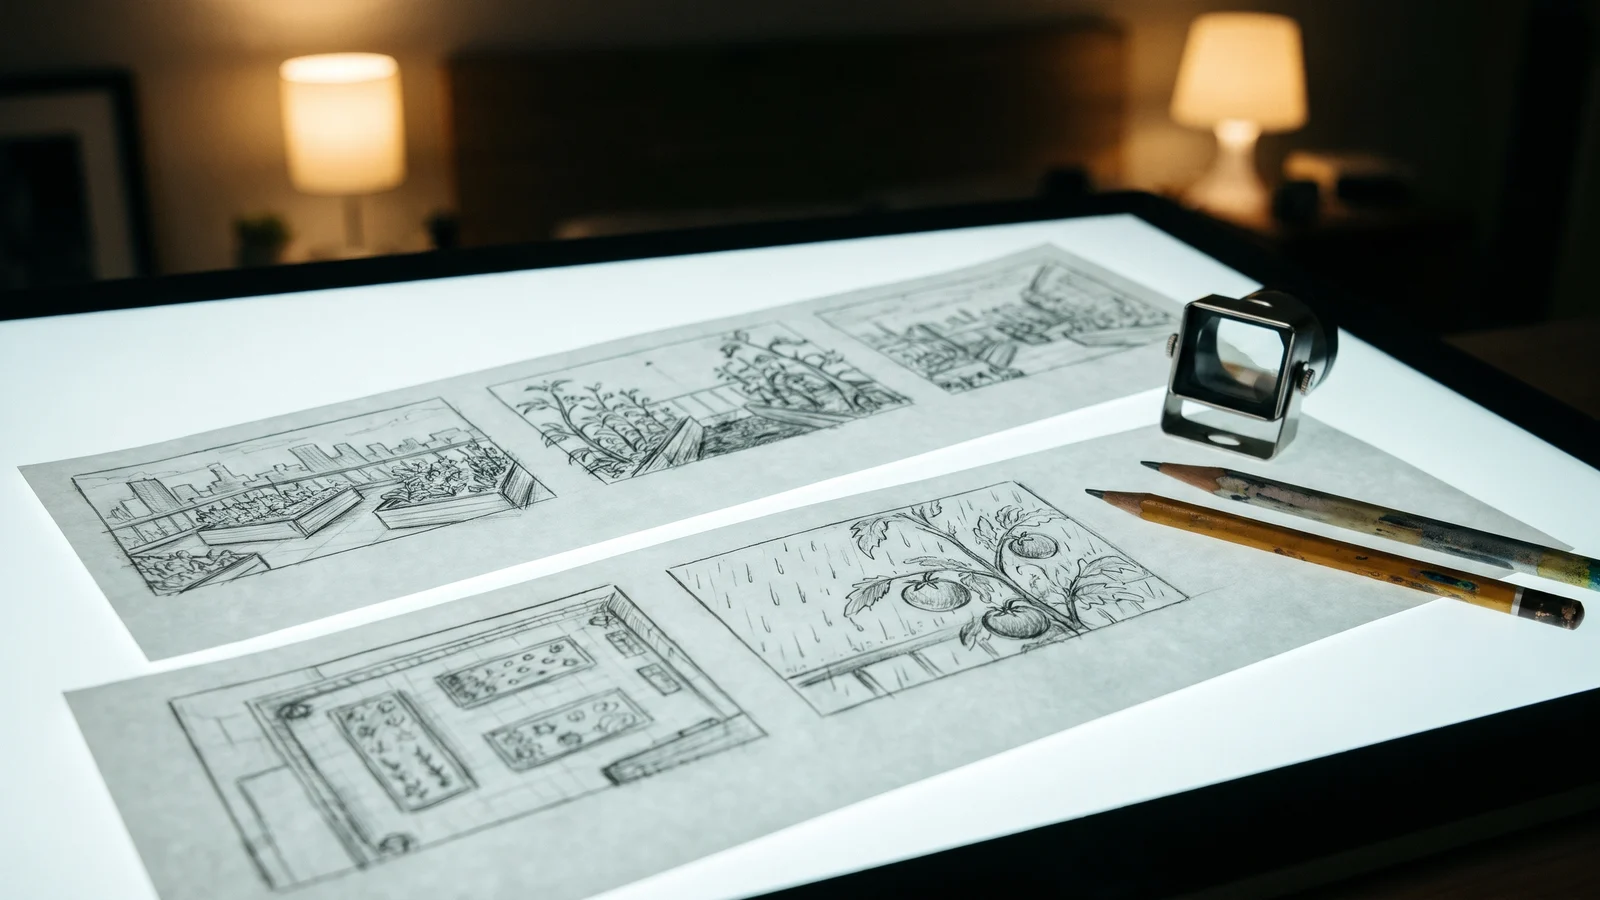
This guide goes from script to storyboard as one job: break the script into a numbered shot list, write the shot size and camera angle into every line, lock the actor and the location with reference images, and draw every panel in one batch. We tested it on a short invented film — a rooftop gardener racing a storm to save her tomato plants — and we show what worked, and the one thing that didn't: camera angles on wide shots.
Gere em lote
Um prompt por linha, centenas de imagens, um ZIP para baixar.
Step 1: Break the script into a numbered shot list#
Don't prompt from the script. Prompt from a shot list. A script tells you what happens; a shot list tells you what the camera sees. Go through the script scene by scene and write one row per shot:
| Shot | Size and angle | Action |
|---|---|---|
| 1A | Extreme wide, high angle | Storm front rolls over the city; the rooftop garden is a small patch |
| 1B | Wide, eye level | The stairwell door opens; she steps out and looks up |
| 1C | Close-up | Her face as she watches the clouds |
| 2A | Over the shoulder | Past her shoulder: the tomato plants bending in the wind |
| 2B | Medium, low angle | She drags the water barrel toward the beds |
| 2C | Extreme close-up | Her hands tie a stem to a bamboo stake |
| 2D | Insert | A single green tomato in the rain |
| 3A | Medium wide, Dutch angle | She holds an old window frame over the bed as a roof |
| 3B | Top-down | She pulls a sheet over the plants |
| 4A | Wide, eye level | After the storm, she sits soaked beside the plants |
Number shots the way crews do — scene number plus a letter (1A, 1B, 1C) — so a new shot can slot in later as 2E without renumbering everything. Keep the action to one moment: if a row needs the word "then", it is two shots.
Tip
If the script is long, paste it into ChatGPT or Claude and ask for exactly this table: one row per shot, a shot size and camera angle in every row, one moment per row. Check the table before you turn it into prompts — it is much cheaper to fix a row than a drawing.
Step 2: Make two references — the actor and the set#
Every panel in a batch is drawn on its own. The model has no memory of the panel before it, so anything your prompt leaves open, it decides again: the actor's face, her coat, where the greenhouse stands. Text descriptions narrow that down but can't close it. References close it.
You need two:
- A character reference: the actor full body, front view, plain background, in the storyboard's drawing style.
- A location reference: the set, empty, in the same style.
This is the prompt we used for the actor. It runs on its own, so you can try it as is:
Character reference for a film storyboard: a woman in her thirties with short curly dark hair and round glasses, an olive rain jacket open over a striped T-shirt, dark work trousers, green rubber boots, a pair of gardening gloves sticking out of the jacket pocket. Full body, front view, standing relaxed, plain white background. Storyboard style: rough graphite pencil sketch on white paper, loose confident lines, light grey tonal shading, no colour, no text, no labels, no panel border.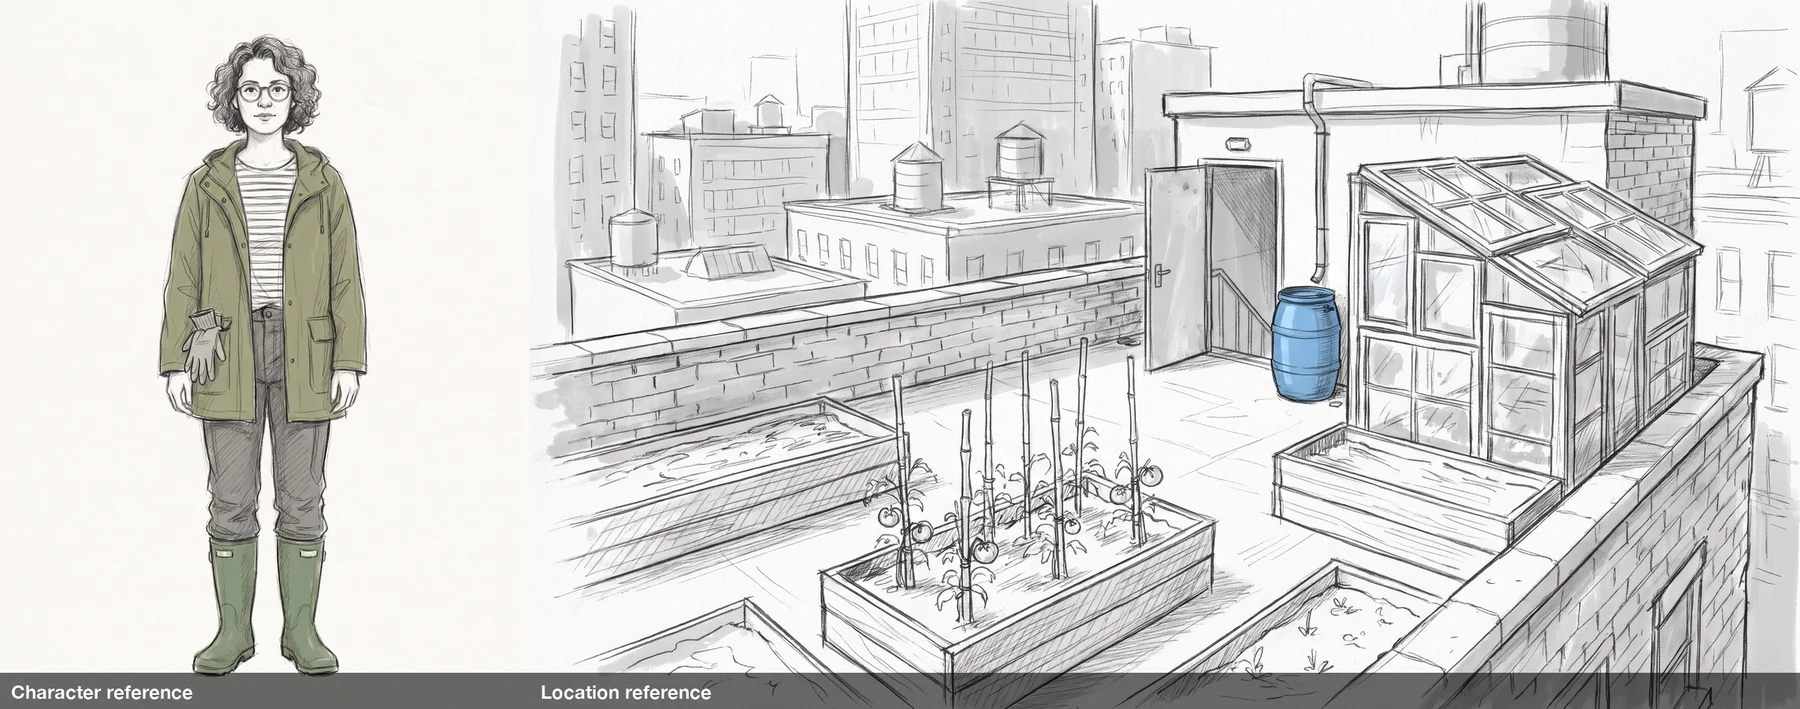
Both prompts said "no colour", and the model still tinted the jacket, the boots and the water barrel. We kept it: a spot of colour on the props that matter is common on real storyboards, and it makes continuity easy to check at a glance. If you need pure greyscale, convert the panels afterwards.
Step 3: Write one line per shot#
Each shot from the table becomes one prompt line, in a fixed order: shot size and angle first, then the action, then a lock sentence that is identical on every line. Shot size first matters — it is the decision the storyboard exists to make, and it should be the first thing the model reads.
The lock sentence names the details that must not change, in both references, and the drawing style:
Use the woman from the first reference image: same face, curly dark hair, round glasses, olive rain jacket, striped T-shirt and green rubber boots. Use the second reference image only for the props and layout of the rooftop garden (planter beds, window-frame greenhouse, blue water barrel, brick parapet), not for its viewpoint or composition. Storyboard style: rough graphite pencil sketch on white paper, loose lines, light grey shading, no text, no labels, no panel border.Shot numbers stay out of the prompt — models draw numbers you didn't want, in the wrong places. The panel order comes from the line order, and you add the numbers when you lay out the board. Here are the first three shots, ready to run once both references are uploaded:
EXTREME WIDE SHOT, HIGH ANGLE over the city at dawn: a dark storm front rolls across the skyline, the rooftop garden is a small patch in the middle distance, no person visible. Use the woman from the first reference image: same face, curly dark hair, round glasses, olive rain jacket, striped T-shirt and green rubber boots. Use the second reference image only for the props and layout of the rooftop garden (planter beds, window-frame greenhouse, blue water barrel, brick parapet), not for its viewpoint or composition. Storyboard style: rough graphite pencil sketch on white paper, loose lines, light grey shading, no text, no labels, no panel border.
WIDE SHOT, EYE LEVEL: the stairwell door swings open and the woman steps out onto the rooftop, looking up at the sky. Use the woman from the first reference image: same face, curly dark hair, round glasses, olive rain jacket, striped T-shirt and green rubber boots. Use the second reference image only for the props and layout of the rooftop garden (planter beds, window-frame greenhouse, blue water barrel, brick parapet), not for its viewpoint or composition. Storyboard style: rough graphite pencil sketch on white paper, loose lines, light grey shading, no text, no labels, no panel border.
CLOSE-UP, slightly low angle: the woman's face as she looks up at the clouds, worried, the wind lifting her curls. Use the woman from the first reference image: same face, curly dark hair, round glasses, olive rain jacket, striped T-shirt and green rubber boots. Use the second reference image only for the props and layout of the rooftop garden (planter beds, window-frame greenhouse, blue water barrel, brick parapet), not for its viewpoint or composition. Storyboard style: rough graphite pencil sketch on white paper, loose lines, light grey shading, no text, no labels, no panel border.
Step 4: Draw the whole board in one batch#
- Open the dashboard and start a New batch.
- Upload both references under Reference images — the actor first, the set second, because the lock sentence refers to them by position — and choose Combine images. In this mode every line gets both images together, so 10 lines make 10 panels. (Per image would pair each line with each reference separately and give you 20 panels, half of them without the actor.)
- Paste all the shot lines into the prompt box, one per line. If your shot list lives in a spreadsheet, switch to Spreadsheet and upload it with the lines in a
promptcolumn. - Pick a model that accepts several references in Combine mode — the form shows the limit for each one, and our models page compares them. We used Nano Banana Pro at 2K. Keep the same model for the whole board.
- Set the ratio to 16:9 for most film and video work. Some models also offer 21:9 if you are boarding a widescreen film.
- Check the estimate — Will generate 10 images · N credits — and press Start batch.
This is the board that one batch drew, with the shot numbers added afterwards:
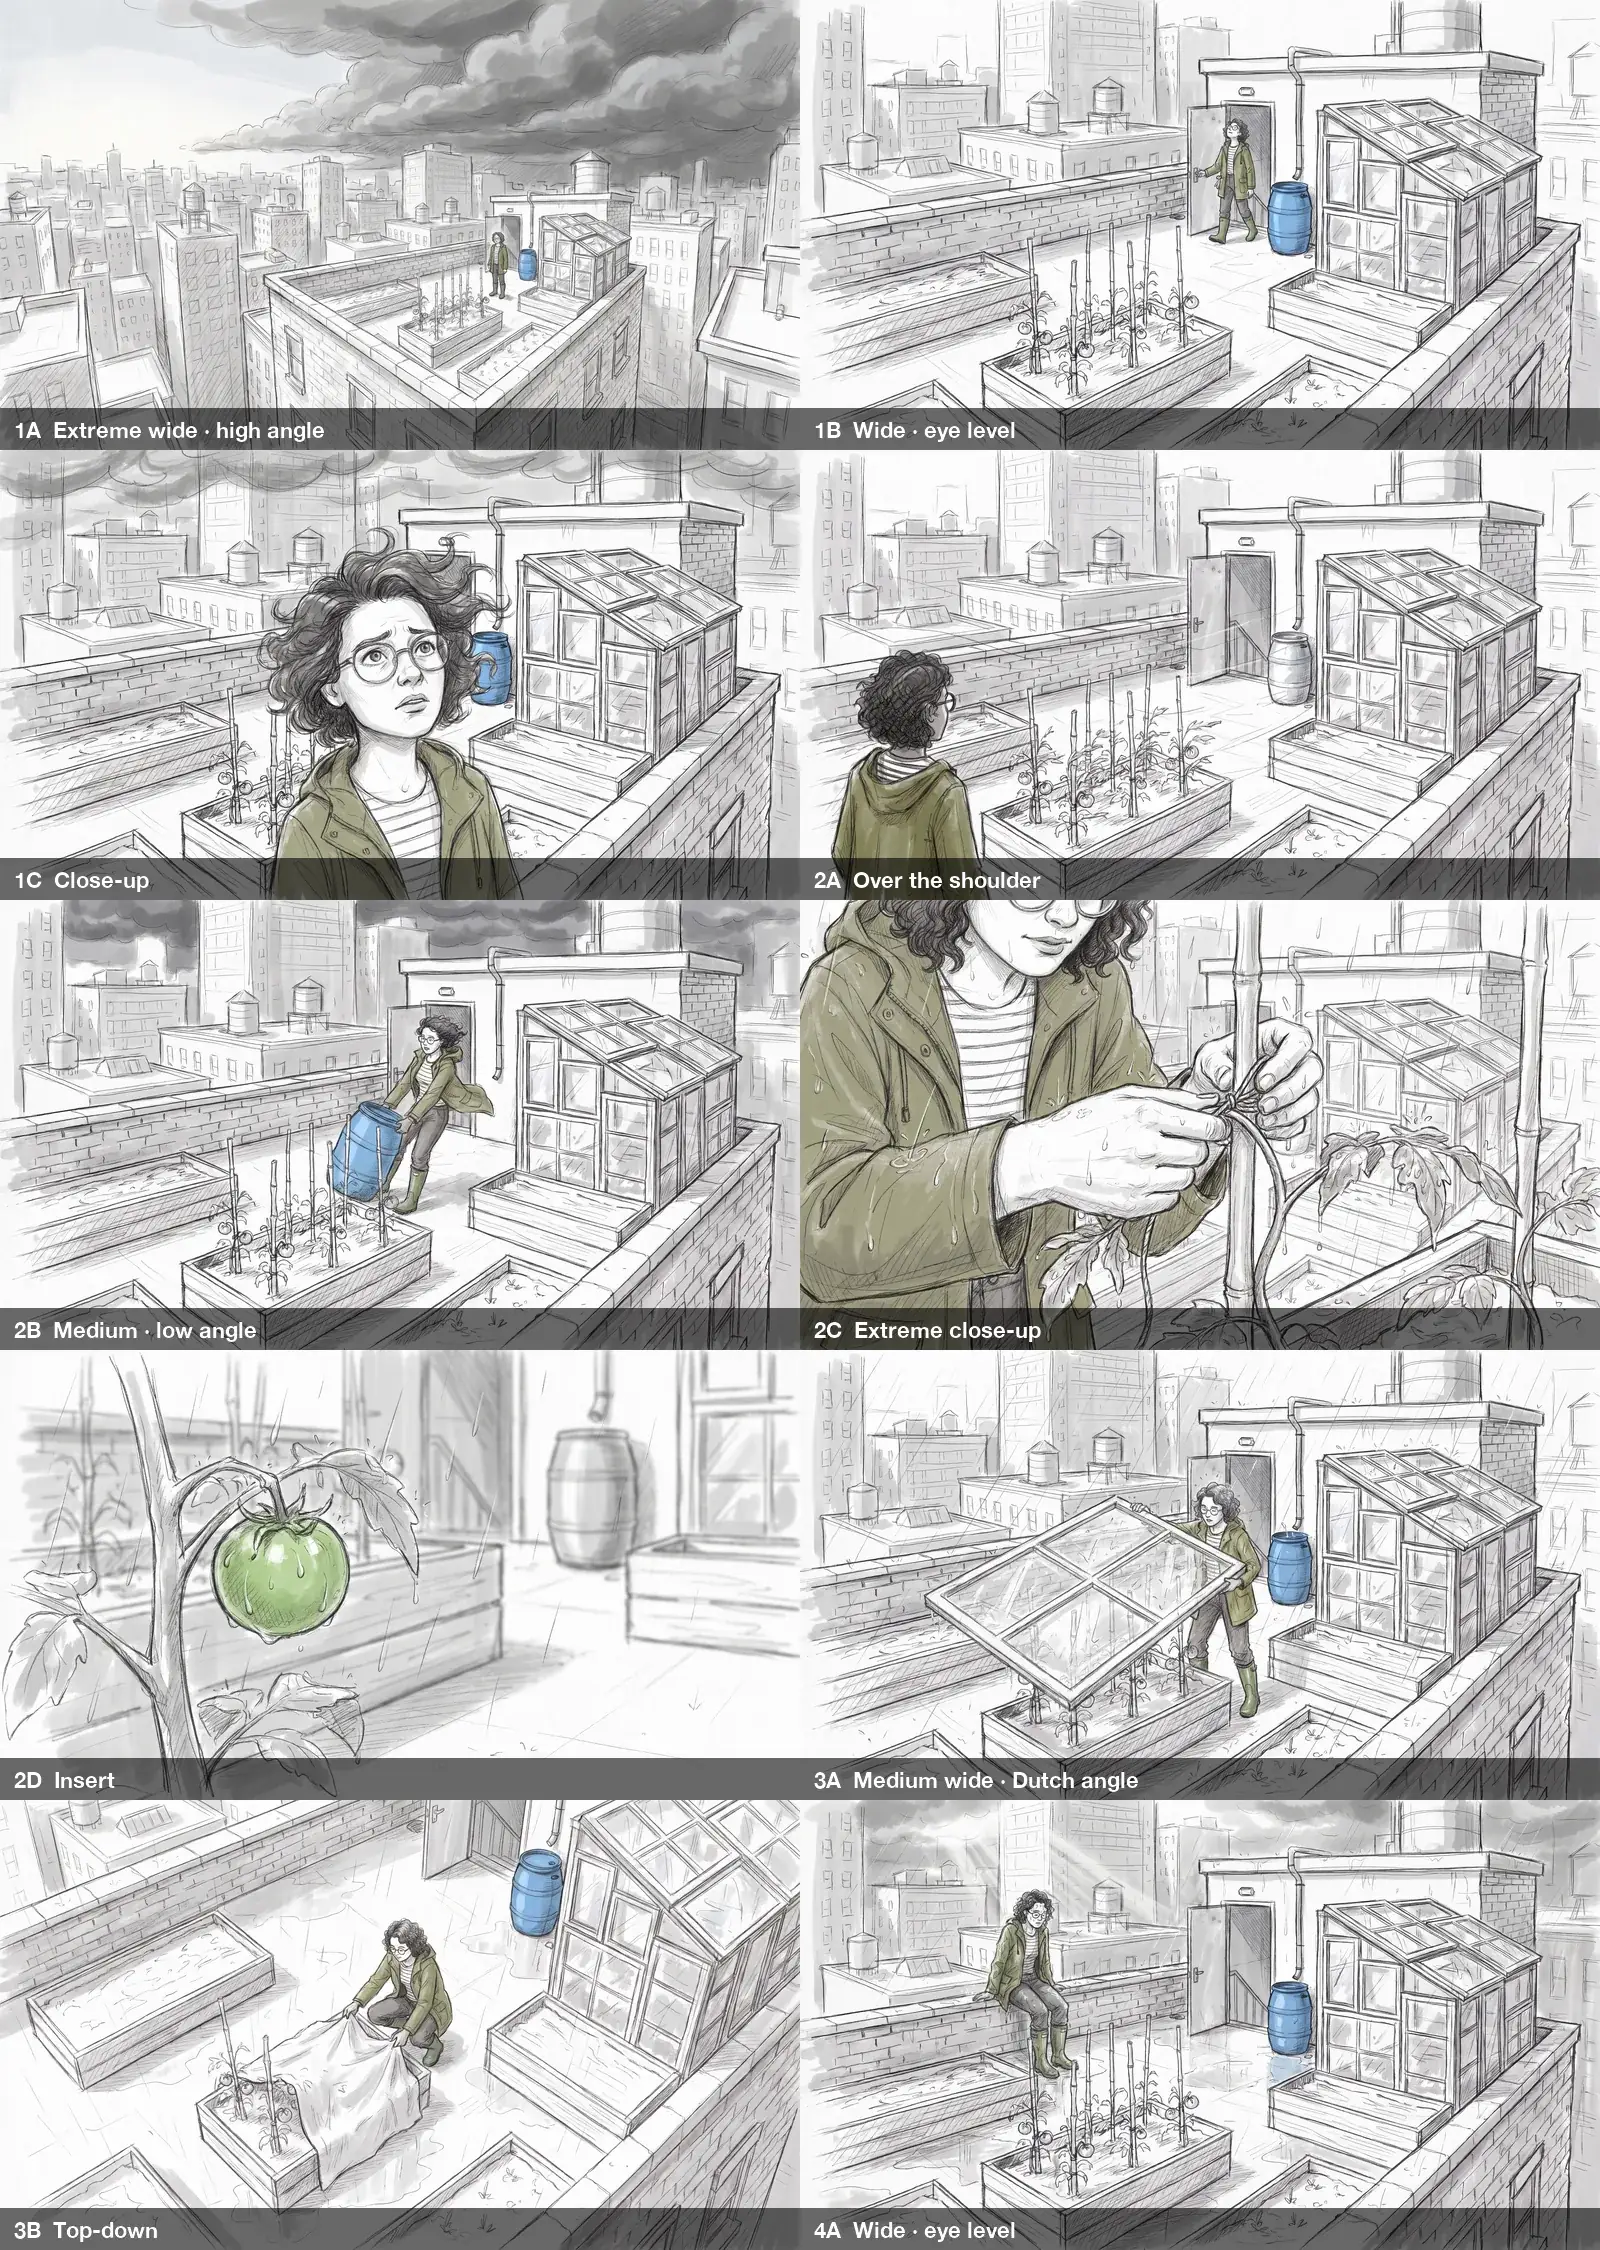
The actor is the same person in all ten panels: same curls, glasses, jacket, striped shirt and boots, from the extreme wide shot to the close-up of her hands. The set holds too — the greenhouse, the stairwell hut and the water barrel are where they belong in every wide shot. Shot sizes came through on every line: the over-the-shoulder, the extreme close-up and the insert are exactly what the table asked for.
Camera angles did not, and that needs its own section.
The catch: the set reference also locks the camera#
Look at 2B, 3A and 3B. We asked for a low angle, a Dutch angle and a top-down view. What we got is, more or less, the viewpoint of the location reference with the actor placed in it. The model doesn't only copy the set from a reference image — it copies the camera position too. Close shots escape it because they show too little of the set; wide shots get pulled back to the reference's own view.
We ran shot 2B four ways to see what helps:
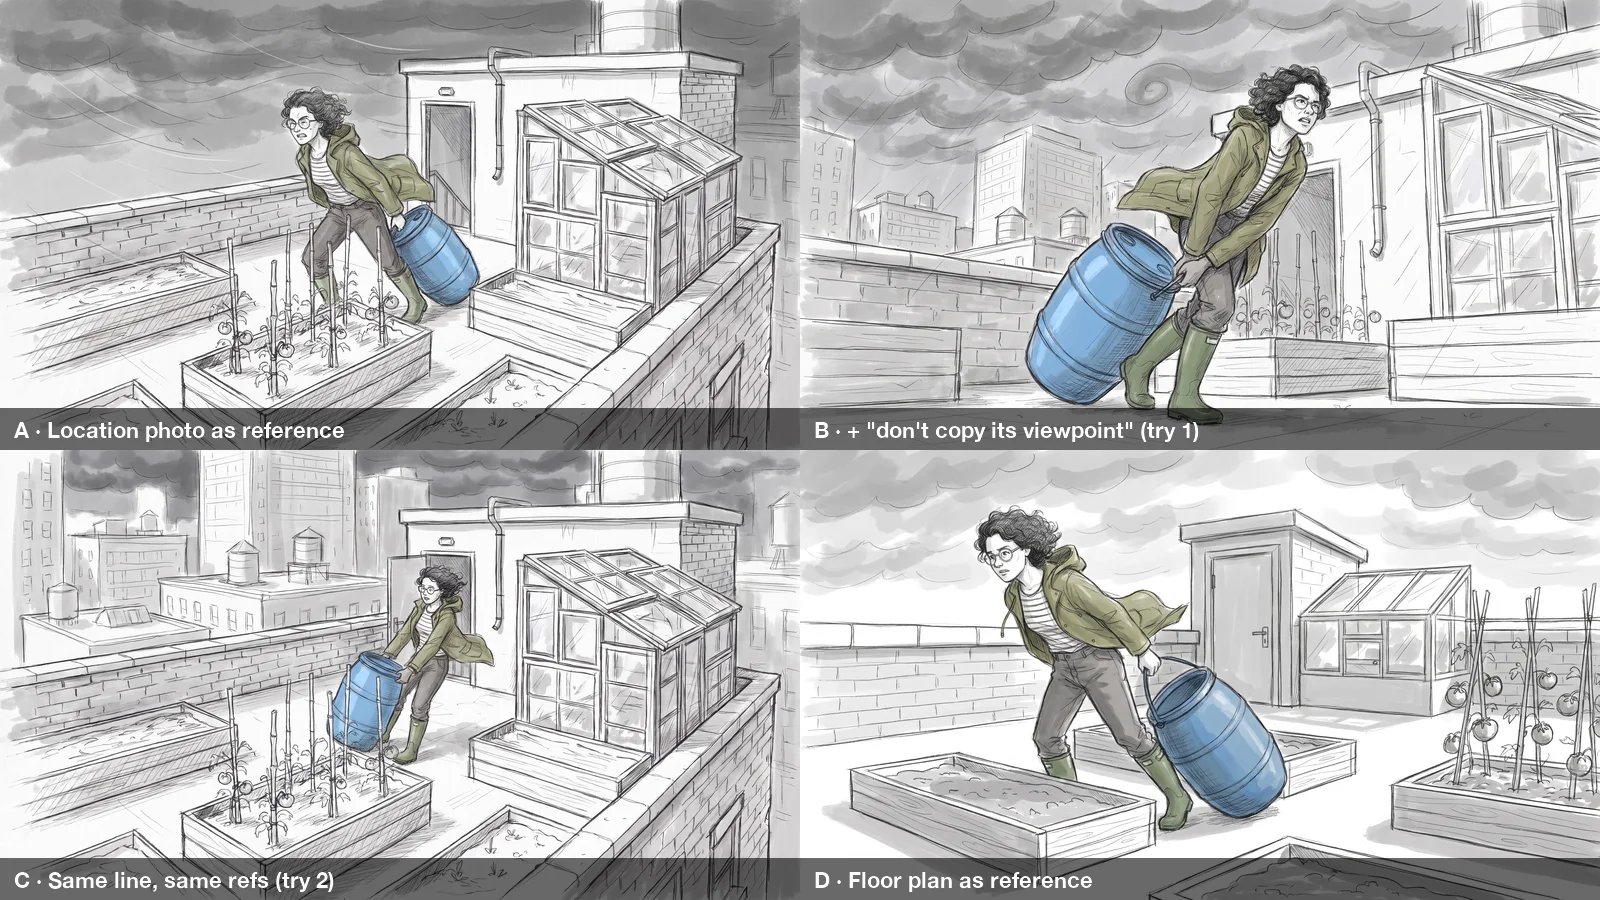
- A — the location drawing as reference, no extra instruction. The reference's viewpoint, almost exactly.
- B and C — the same line plus "only for the props and layout … not for its viewpoint or composition". The first try came out from a lower angle with the set intact. The second try, inside the full batch, went straight back to the reference's view. The sentence helps sometimes; it doesn't fix it.
- D — a floor plan as the location reference. A floor plan has no camera position to copy, so the model has to build the view itself. The layout survived: the stairwell door, the barrel beside it, the greenhouse next to the hut, four planter beds. What didn't survive is anything the plan doesn't show — the city skyline and the water towers are gone.
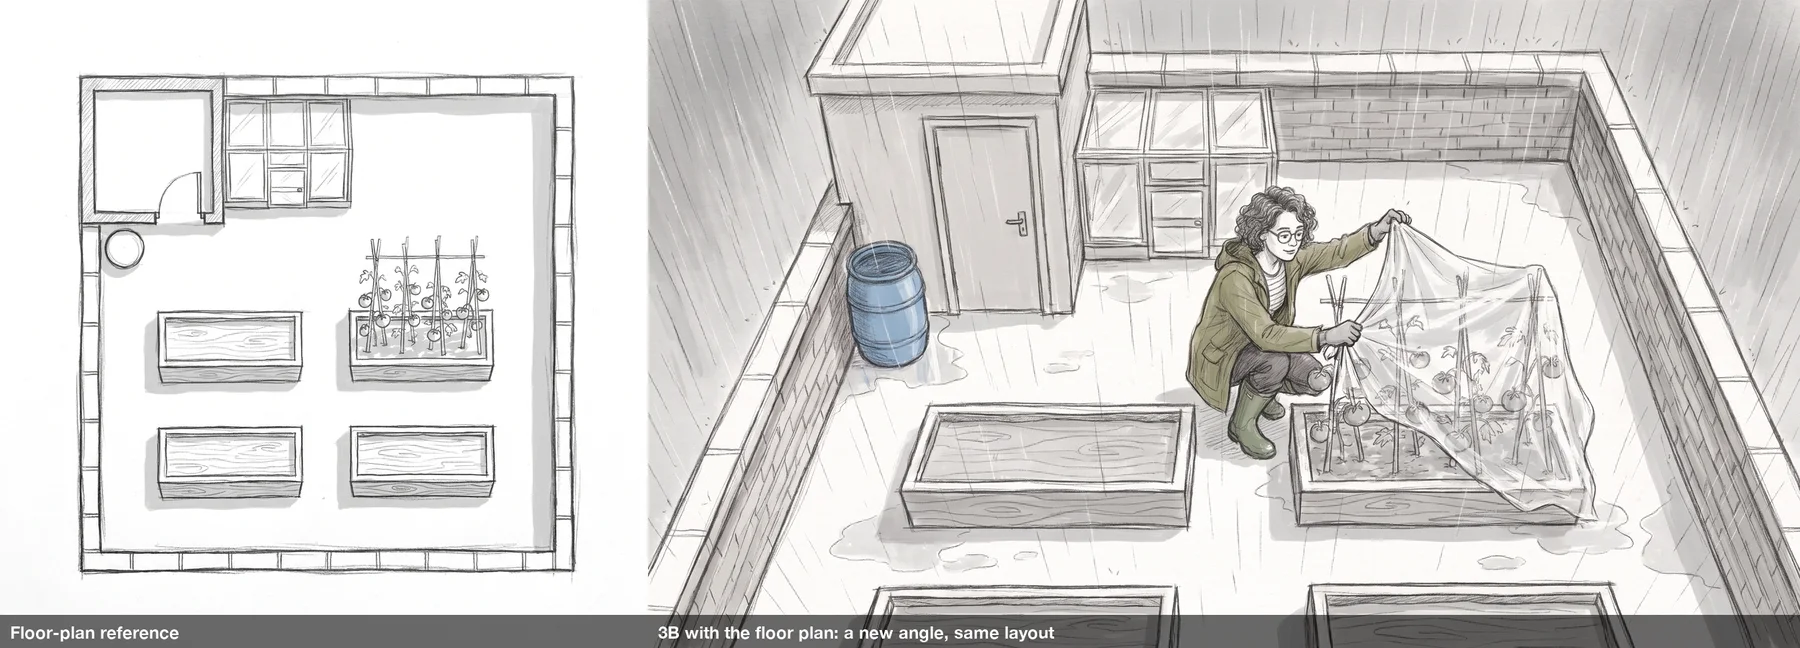
Neither reference type gave us a true worm's-eye view or a straight-down overhead in our tests: "low angle" came out close to eye level and "top-down" came out as a high three-quarter view. Here is how we would set up the next board:
- Close shots (close-up, insert, over the shoulder): the location drawing is fine. The camera problem doesn't show up.
- Wide shots that need a different angle from the reference: use a floor plan of the set instead, and add the background in a sentence ("apartment towers and rooftop water tanks behind").
- Extreme angles (worm's-eye, overhead, Dutch): expect to re-run the line once or twice, or keep the panel and write the angle under it on the board. A storyboard is a plan for the camera team, not the final frame.
A floor plan is one more prompt. Ours:
Top-down floor plan of a rooftop vegetable garden for a film storyboard, seen from directly above: the square roof edged by a low brick parapet, a stairwell hut with a door in one corner, a small greenhouse built from old window frames beside it, a blue water barrel next to the stairwell door, four raised wooden planter beds in the middle, the largest one with tomato plants on bamboo stakes. Architectural sketch, rough graphite pencil on white paper, light grey shading, no text, no labels, no arrows, no people.Note
All of this is from small test runs — one short film, one model, one or two tries per variant. Treat it as a strong tendency, not a rule, and check your own first batch before you run a long script.
Step 5: Review, fix single panels, download#
Go through the board shot by shot and check three things: is it the right actor, is the set where it should be, and is the camera where the table says? Fix a panel by editing its line and running just that line again — not the whole board. If a panel failed outright, Retry failed re-runs only the failures, and failed images are refunded.
Download all gives you every panel in one ZIP, numbered in the order of your lines, so they are already in shot order when you lay out the board or drop them on an animatic timeline. Add the shot numbers and dialogue under each panel in whatever you use for the board.
For more on keeping a character steady across a long sequence, see our guide to consistent character AI images. If you are making finished frames for a narrated video rather than a pre-production board, AI images for YouTube videos walks through that version. And if you would rather fill in a form than write lines, the AI storyboard generator has the drawing styles and shot sizes built in.
FAQ#
Can AI make a storyboard straight from a script?#
It can draft the shot list, and it can draw the panels — but do it as two steps. Turn the script into a numbered shot table first, check it, then run one prompt line per shot. Feeding a whole scene into one image prompt gives you one picture, not a sequence.
How do I keep the same actor in every panel?#
Attach a character reference to every line and repeat one lock sentence that names what can't change: face, hair, glasses, clothes. In our 10-shot board the actor held in every panel. Text alone isn't enough over ten or more panels.
Why does every wide shot come out from the same angle?#
The location reference sets the camera as well as the set. Use it for close shots, and use a floor plan of the set as the reference when a wide shot needs a different angle.
How many shots can I run at once?#
As many as your plan allows per batch — the pricing page lists the batch size for each plan. A long film can be split into one batch per scene with the same references and the same lock sentence, so the panels still match.
Should a storyboard be in colour?#
Most boards are greyscale pencil, which is quick to read and doesn't distract from the framing. A spot of colour on the props that matter for continuity — a coat, a prop, a vehicle — is common and helpful.
The whole workflow on one card#
- Script → numbered shot table: size and angle, one moment per row.
- Make an actor reference and a set reference in the board's drawing style; a floor plan for wide shots.
- One line per shot: size and angle first, action, then the same lock sentence.
- Combine images, actor first, set second, one batch for the whole board — the bulk image generator draws every panel at once.
- Check actor, set and camera; re-run single lines; download in shot order.